Monday, November 30, 2015

Make It Monday #233 Splatters

Papertrey Ink MIM Challenge

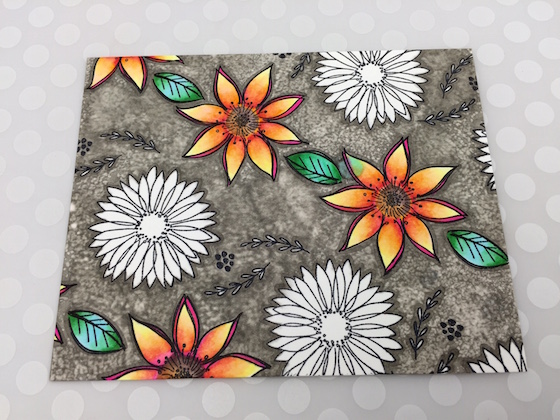
I love splatters, I can remember
"splatter painting" as a kid, we
used an old toothbrush and rubbed
our thumbs over the bristles.
Now that I''ve grown up, I use a 
paint brush! ;)

I have two brothers-in-law with
birthdays in December so made these
masculine cards and added the splatters.


These are regular A2 cards, not sure
why the picture is distorted!
Supplies:
PTI Sketched Shapes & Balloon Bash sets
Ranger DI in these colors:
Chipped Sapphire, Hickory Smoke
Ground Espresso & Stormy Sky
SSS Black ink

Friday, November 27, 2015

Ranunculus Watercolor

I inked up my Stampendous
Ranunculus stamp for the first time.
I looked for an idea of how to color
this image and found Ellie's take
on it, beautiful! See it HERE.
She has such gorgeous backgrounds, too.

I'll need lots more practice but
I do like how it turned out.


I used Artist's Loft water colors 
and the sentiment is from
Essentials by Ellen.

Thanks for stopping by!

Tuesday, November 24, 2015

Holiday Style Using Tiny Stamps

 I had time and energy for one more
card tonight. I had a couple tiny stamps
laying on my desk from Day 2 when
we saw how to use them.

I went at it a little differently but
I probably haven't used these little guys
very much until now. I still want to try 
the tree shape like May did.


I'm going to call this Cute & Whimsical which
was on Day 5. I think it fits that category better.

I cut some stencils of ornaments on my
Silhouette and then ink blended them
with Festive Berries & Twisted Citron DIs.

I heat embossed my little stamps
using VersaFine black ink and Ranger
Liquid Plantinum ep.

The stamps are from Unity.
I offset the front panel, popped it up
with 3M foam tape and added some
Paper Studio twine.

One more for Holiday Style Card Class

I started this card last week for 
the day of class that focused on
Shimmer & Shine. I just had some
time yesterday to finish it up.


Sorry for the glare, hard to capture
all the fun glitz and shine!


I used VersaMark to adhere the foil
and then heated it with my iron.

The ingredients:
Ranger texture paste
TCW mini flurries stencil
Ranger holographic EP
Heidi Swapp silver Minc foil
Jillibean Soup Handwritten Sentiments
Silver glitter paper


Saturday, November 21, 2015

Holiday Style Soft & Subtle


The final challenge for the
Holiday Style Card Class is
to create something from each day's
theme using one stamp/set.
I chose my tree stamp from
Comotion Rubber Stamp

Day 5 was Soft & Subtle


Here are the other ingredients:
TH watercolor paper
Clear Dollar Fanciful Flakes
CHF sentiment
Weathered Wood w/ waterbrush 
Walnut Distress Stains
Scattered Straw DI
Sizzix scallop rectangle frame
MS cs
WOW! opaque bright white ep
VersaMark
Leisure Art metallic thread
Paper Studio pearls

Thanks for stopping by!

Holiday Style Shimmer & Shine

The final challenge for the
Holiday Style Card Class is
to create something from each day's
theme using one stamp/set.
I chose my tree stamp from
Comotion Rubber Stamp

Day 4 was Shimmer & Shine


I tried Jennifer's hint to dry emboss the
foil cardstock! LOVE IT!

Here are the rest of the ingredients:
Gold foil cs, vellum from stash
Wausau Crinkles paper in pimiento
TH Christmas background & borders set
CHF sentiment, ZING! gold ep
VersaMark


Holiday Style Cute & Whimsical

The final challenge for the
Holiday Style Card Class is
to create something from each day's
theme using one stamp/set.
I chose my tree stamp from
Comotion Rubber Stamp

Day 3 was Cute & Whimsical


My tree stamp is wood mounted so for a guide I
taped my T-ruler to my Scor-Pal grid mat
and stamped along the edge. 

Here are the rest of the ingredients:
CHF sentiment
Festive Berries & Peeled Paint DI
VersaMark, Ranger red ep
WOW! Clear Gloss ep
Silver Stickles

Thanks for stopping by!

Holiday Style CAS

The final challenge for the
Holiday Style Card Class is
to create something from each day's
theme using one stamp/set.
I chose my tree stamp from
Comotion Rubber Stamp

Day 1 was Clean & Simple


I followed Julie's example quite closely
and was pleased with how easy it is to
stamp the tree with Forest Moss DI &
use my waterbrush to spread the ink a bit.

I found a random star on my desk and
colored it with a Y17 Copic. Instead of
splatters, I used my Heirloom Gold Perfect Pearls.

The rest of the ingredients are:
CHF sentiment, Canson watercolor paper
Cartwrights Sequins & Beads flat bright gold 5mm

Thanks for stopping by, have a great weekend!

Friday, November 20, 2015

Holiday Style Classic & Elegant


The final challenge for the
Holiday Style Card Class is
to create something from each day's
theme using one stamp/set.
I chose my tree stamp from
Comotion Rubber Stamp.

Day 2 was Classic & Elegant


This card came together the easiet of all 5!
I actually bought the paper a couple years
ago to make a wedding card for my sister.

I used Jennifer's technique to stamp on
vellum and die cut it into a circle,
folding it over the side and holding
the other edge down with a die cut.
I found the perfect one laying in my mess
and thought the monochromatic look
was the perfect touch.

Wednesday, November 18, 2015

Day 9 Soft & Subtle

Holiday Style Card Class is about
soft & subtle colors and that includes
water-coloring.
As soon as I saw Michelle's'soft
water-colored background an idea for how to 
give our kids their annual Christmas tree
ornament popped into my head!


My end results don't look very
soft & subtle but my water-coloring
behind the stars fits the bill. I added yellow
and gray splatters for interest and then some
Perfect Pearls mist.

One of the cards uses smooshing
with an acetate sheet and watercolor.
I used my MISTI to double stamp the sentiment
with Hickory Smoke ink on each card.


Canson #140 watercolor paper
Artist's Loft watercolors
Brilliance galaxy gold ink
Perfect Pearls
Stampers Anonymous Season's Silhouettes
CHF sentiment
Hickory Smoke DI
Stars handmade in Haiti, 


The story behind giving our kids ornaments
made in Haiti: In 1997 I went to Pignon, Haiti,
with our oldest daughter on a mission trip to do some 
painting and other work for a hospital there.
Check out Promise for Haiti. At the county
fair we went to this September there was a 
booth selling these ornaments to support
people in Haiti. I knew I had found the perfect
ornament for this year's gift to the kids.


Tuesday, November 17, 2015

More Cute & Whimsical

I pretty much fell for Jocelyn's card that
was featured on SSS on Monday! Oh, so cute! 
You can check it out HERE.

I bought jar & lid stamps 
at a county fair we went to back in September 
and this was just the perfect time to ink it up.


I used the MISTI technique of restamping
with VersaMark and heat embossing
the image after coloring with my Copics.
Love this effect! Had to give both my
snowmen a chance to shine.
Thanks for stopping by!

The jar lid is seperate and I popped it
up with 3M tape.

Paper: Cryogen White & Canson watercolor
PS Silver Ornate Foliage
Copics: R22, R24, R46 YG17, G24, Y17
C3, C5, C7, W1, BG000, E99,
DI: Peacock Feathers, Hickory Smoke
DI marker: Frayed Burlap
Inks: Memento London Fog, VersaMark
Stamps: Unity snowman, mittens
Sarasota Stamps jar/lid. Clear Dollar snowflakes
PTI Sketched Shapes sentiment
IRIS craft thread
Ranger Liquid Platinum & holographic ep
Wink of Stella


Monday, November 16, 2015

Silver Shimmer & Shine

Here is my second card for Day 7
of the Holiday Style card class.
I cut the Merry Christmas
file on my Silhouette and then
used VersaMark and clear ep
on the cut. Then I used foil and my 
iron to adhere it. That was about
80% successful. I was going to leave
it white but I just couldn't so I used
my VersaMarker and some silver ep
to fill in the gaps. I like the two-tone
silver, works with the glitter paper I
used along the bottom of the card.


To finish it up, I silver heat embossed the
two sets of holly leaves and added some 
silver sequins from Horizon.

Thanks for stopping by!

Shimmer & Shine on Day 7

I had embossing powder on my chin tonight!
I kind of hate glitter, but I love heat embossing 
so I did some of that today for the Online Card
Class's glitzy day.

Here is my gold card. I used a Silhouette
file to cut out two "Joy to the World"s.
I covered it with VersaMark and used
gold ep and then colored the second one black
for a shadow as suggested by Carissa.

I also gold embossed Aged Sheet Music
on some weathered wood dp.


To ensure my matt matched, I used
VersaMark and more of the same ZING! gold ep
around the edges of my card base, which 
is #110 Neenah.


Friday, November 13, 2015

Joyful Penguins

I love these little Unity penguins!
They are just the cutest little guys ever.
I also used a Unity stamp that I cut
the ornaments from.


More ink blending and Clear Dollar Fanciful Flakes.
Horizon sequins and Copic coloring.
I used my MISTI and was glad I did as
I had to double stamp each penguin to get
good coverage.

Have a great day and thanks for stopping.

Holiday Style Cute and Whimsical #2

I altered another Penny Black stamp
for my second card. This kitty was holding a 
layered cake with candles on top so I made
the corners square so they look more like gifts
and wiped the ink off the candles before stamping.

I decided to try a shaker card with a small
packet like I've seen other people make. I don't
like this method as much as outlining the area
with foam tape. (Sorry the pics/color aren't the
best, ran out of daylight.)


And here is what the inside looks like:


Thanks for stopping by!


Holiday Style Cute & Whimsical

The examples in Holiday Style Online Card Class 
today are just adorable!

The mailman came through just in time. I 
knew I didn't have much for cute little
animals, maybe and owl or penquin but
that's about it. I had ordered the Penny
Black set Sweet & Cute and it was just
the thing with a little adaptation.....
I took away the cupcake and birthday
hat and replaced them with hand drawn
gift and stocking hat.


I added a Unity sentiment, some ink blending in SSS Maliblue,
Clear Dollar snowflakes in the same ink and some 
Studio g gems to add some sparkle.
 Colored with Copics and masked my snowbank
with Inkadinkadoo masking paper.

Thursday, November 12, 2015

Holiday Style Day 4 Inspiration

I was inspired by Kristina's snowflake
card today. I blended Blueprint Sketch DI 
and then embossed snowflakes along
the bottom edge of my card with Ranger
holographic ep, love that stuff!


I bought a couple tinfoil pie plates today
and the covers for them were perfect for 
die cutting these Spellbinders snowflakes!
The sentiment is from Unity and uses VersaMark
and Ranger silver ep. I added some Studio g gems
to finish the card.


This one is also inspired by Debbie's white on white
card from Day 3. I heat embossed holographic
snowflakes on this one, too. I die cut the snowflakes 
from Colorbok Fresh Snow glitter paper.
Spellbinders snowflake dies
Unity sentiment and snowflake stamps
VersaFine black ink
Horizon Group sequins
Ranger holographic ep


Holiday Style Day 3 Classic & Elegant

Here are a couple sepia cards 
fashioned after Kristina's example from
Day 3 of the Holiday Style card class.


Comotion stamp, Vintage Photo & Antique Linen
DIs, ZING! gold ep, Pilot gold marker, 
clear Wink of Stella, VersaMark
White Neenah #110 cs


Unity stamp, SSS assorted moonshine sequins,
Archival Brilliance Coffee Bean ink,
Vintage Photo & Antique Linen DIs, ZING! gold ep, 
Horizon group sequins, Recollections ivory cs

Thanks for stopping by!


Tuesday, November 10, 2015

Holiday Style Day 1 Clean Layers

This was a fun card to make for Day 1 of 
the Holiday Style class over at 
Online Card Classes. I love 
using Distress Inks and resist embossing!
Debbie Hughes' card is just gorgeous!

AND I got my MISTI in the mail today so
positioning this red rubber sentiment was the first
thing I used it for. Worked like a charm!


The stamps are from Clear Dollar-Fanciful Flakes
and the sentiment is CHF.
The dies are Spellbinders snowflakes and
Curved Borders 1.
I used Broken China and Chipped Sapphire DI
for the background, added splatters and some
Perfect Pearl splatters, too.

The sentiment and snowflakes are embossed
with VersaMark and Ranger Liquid Platinum ep.
The snowflakes are embossed with WOW opaque white ep.
I used Ranger watercolor paper and put it on
Neenah #110 white cs.

Thanks for stopping by!

Monday, November 9, 2015

Day 1 CAS Crisp Texture

Here is my take on Laurie Willison's
clean, crisp, one layer card,
using the principle of thirds and lots of
white space.


I used Peeled Paint DI and my full size
Score Pal for the scored lines.  It worked great!
I stamped my holly onto paper I had used more
DI on and then stamped the berries on red cs and
cut them out.  The holly is popped up.
The sentiment is Unity Stamp Co.

Holiday Style Card Class Day 1 CAS

I just can't resist the Holiday Card Class at
Online Card Classes!
I made my card based on Julie's example.
My CAS card has various colors of pine trees
(All Night Media stamp)
 in the foreground.  I used Forest Moss DI,
SSS Beanstalk Green and SU River Rock inks.
The sentiment is Unity Peace & Joy.


Friday, September 25, 2015

Simon Monday Challenge

EDIT: This card earned me that SSS
Designer Spotlight Badge on my sidebar!

Taking part in this week's 
rubber or clear stamps. I used them both!
The sentiment is from the SSS Blessings set.
The leaves are from Unity.


I smooshed Distress Inks on my Tim Holtz
watercolor paper. Embossed the leaves with 
Ranger Platinum EP and watercolored them
wih the same DIs. Added a few splatters, too.

Thanks for stopping by!

Sunday, September 20, 2015

September Pin Sights Challenge

Time to post for a challenge before my blog dries up and blows away!

The challenge is from the CLASSROOM.
The Essentials by Ellen product I used is the 
Amazing Women stamp set that includes the word Sister.

My sil in Washington state celebrates her birthday next week 
so this will be on it's way tomorrow.

Here is the inspiration photo:

I used some white embossing on navy
and chose the colors for my balloons from
the color swatches.


Thanks for stopping by!


Sunday, June 7, 2015

Pretty Pink Posh Watercolor Blog Hop


Join in the PPP Blog Hop! 
Check out the post HERE.


I needed a bunch of bookmarks for gifts for 
families of veterans so came up with
this watercolor design.


Sentiment from SSS
Die is PaperSmooches
Distress Inks
Ranger Texture Paste

Sunday, May 17, 2015

Simon Says Stamp Challenge


I made a couple simple cards for the challenge to 
use SSS products. Makes card making so easy!
You can find the challenge HERE.


I used SSS Big Hello die, black ink
and sentiment
Thanks for stopping by!

Sunday, May 10, 2015

My Copic Hex Chart

I just couldn't resist buying and
downloading Sandy Allnock's 
Hex Chart! I could see as I
filled it in how valuable it is going
to be for finding colors AND for
making sure I buy the right ones 
as I go forward.


My main chart is printed on Cryogen while the 
grays are on Neenah.

I used washi tape to attach my grays chart 
As Sandy suggested.


Happy Mother's Day!

Here are the cards I made for
My dear mom and mother-in-law.

This card was inspired by 
Laura's card she shared for the Hex Chart
Blog Hop HERE.


Silhouette word file, Inspired Stamps sentiment stamp,
Autumn Leaves Stampology flower stamps.
White gel pen and Liquid Pearl accents.

My MIL's card:


TH butterflies dies
Paper Smooches blessed die
Inspired Stamps sentiments
Watercolor on TH watercolor paper
with Ranger Distress Inks.

Sunday, March 22, 2015

30 Day Color Challenge

I'm totally enjoying the
the 30 Day Color Challenge
at The Daily Marker.  We 
are on day 19 and I got to
color a simple sheet of 
butterflies I stamped with
an Altenew stamp I won somewhere
along the line.
  
Here is the image after I 
finished the main coloring.


I was debating if I should leave it or add 
some colorless blender between the butterflies.

Then I went to The Daily Marker
to see what Kathy posted for today.

FullSizeRender 2

So I just had to go for it with my
colorless blender.


Might add some white gel pen.....

Friday, March 20, 2015

Julie's 3rd Annual Blog Hop

I'm SO happy to be celebrating Julie's 3rd Blogoversary,
"Lucky to Call You Friend"!
I love the friendships I've gained through
card-making, etc., online!


The entire list of prizes and the Hop
details and participants are all available 
on Julie's blog HERE.

You should have come here from
Donna's blog At Studio 307

Julie has gone to a ton of work to put this hop together.
Be sure to leave a comment on each blog
for your chance at the prizes
and there is free digi paper for everyone!

I stayed with one line of paper and used stamps
and a die from Paper Smooches and SSS.
 I made three different cards for our celebration
this weekend.


Here is my tip for the day: Cut your dies from the
middle of the matting layer.


Julie is such a great friend so 
this card is in honor of her and her Hop:


Next on the Hop is Ema.
Check out her wonderful coloring

Thanks so much for stopping by,
 LOTS of prizes from LOTS OF SPONSORS 
so be sure to leave a comment!